Learn how to quickly reset your WordPress password in just a few simple steps. Our guide makes it easy to regain access to your site.
How to Add a Blog Post to Your WordPress Website Using the Classic Editor Plugin
Master the art of blog creation on WordPress with our simple guide. Learn the essential steps to craft compelling posts using the Classic Editor plugin.NBT Knowledge Base
How to Log in to Your WordPress Website
Learn the quick and easy steps to log into your WordPress website. Access your dashboard in a few clicks and start managing your site’s content and settings effortlessly.
Giving NB Technologies Access to Your Facebook Business Page
Discover how to effortlessly give NB Technologies access to your Facebook Business Page with our comprehensive guide. Perfect for streamlining your social media management.
How to Give NBT Admin Permissions for Your Google Business Profile
Learn how to grant admin permissions to NB Technologies for your Google Business Profile with our easy step-by-step guide. Manage your online presence more effectively!
How to Send Files via WeTransfer
Explore our guide on using WeTransfer effectively: Learn best practices for sending files and streamline your digital transfers with ease.
Creating blog posts on your WordPress website is a straightforward process. At NBT, we typically use the Classic Editor plugin for blog posts due to its simplicity and user-friendly interface.
In WordPress, a blog post comprises several components:
- Title: The headline of your blog post.
- Body: The main text of your blog post.
- Featured Image: An image that appears at the top of your blog post and acts as the thumbnail in blog listings or landing pages.
- Author: The person credited with writing the blog post.
- Category: The section of your website where the blog post belongs.
- Tag: Keywords associated with your blog post.
- Excerpt: A short summary of your blog post.
- Publish: The control section for making your blog post live on your website.
- Yoast SEO: A plugin for optimizing your post for search engines (SEO).
Let’s break down the process of creating a new blog post.
A quick note before you begin
At NBT, we build most of our websites using the Divi theme. While Divi provides a powerful visual editor for designing and customizing your site, it’s important to note that this visual editor is not compatible with publishing blogs. Instead, we recommend using the Classic Editor for creating and publishing blog posts.
Step 1: Access the Classic Editor
- From your WordPress Dashboard, navigate to Posts > Add New.
- If the Classic Editor is not your default, you can select it by clicking on the “Edit (Classic)” link under the post title.
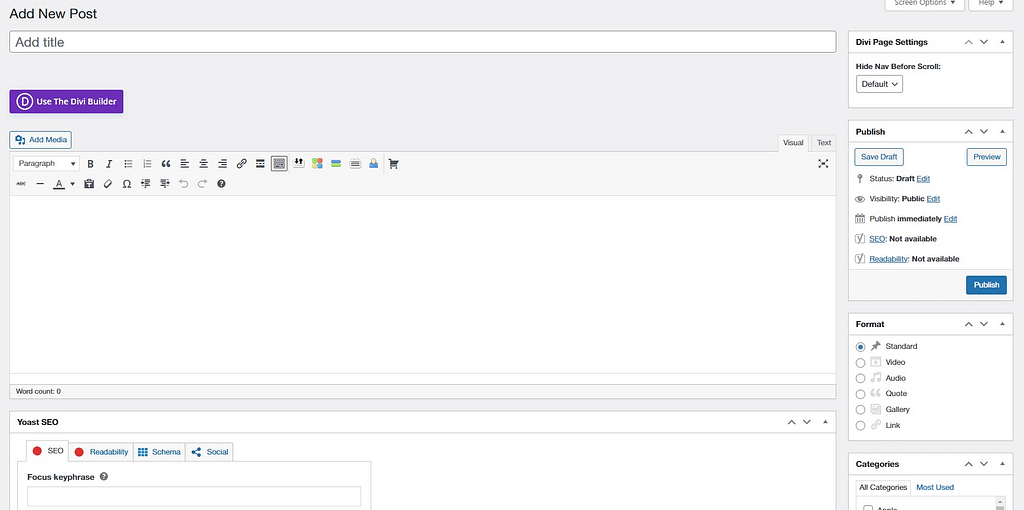
Step 2: Add the Title and Body of Your Post
The first two blocks you’ll see in the Classic Editor are for the title and body of your post.
- Title: Enter a compelling and descriptive title for your post.
- Body: This is where you write or paste your post content.
Step 3: Set the Featured Image
- You can find the Featured Image box, usually located in the lower right-hand corner of the screen.
Step 4: Assign the Author
In the Author block, select the name of the person who wrote the post.
Step 5: Set the Category and Tags
- Category: Choose the relevant category for your post.
- Tags: Enter keywords in the Tags box.
Step 6: Write the Excerpt
In the Excerpt box, write a brief summary of your post.
Step 7: Set Yoast SEO Fields
Yoast SEO is a plugin utilized by NBT that helps optimize your content for search engines.
- Set a focus keyword: Choose a key phrase for your post.
Step 8: Publish Your Post
Review your post for any mistakes or omissions, then publish it.
Congratulations! You’ve just created and published a blog post on WordPress using the Classic Editor plugin the NBT way!
NBT Knowledge Base
How to Reset Your WordPress Website Password
Learn how to quickly reset your WordPress password in just a few simple steps. Our guide makes it easy to regain access to your site.
How to Log in to Your WordPress Website
Learn the quick and easy steps to log into your WordPress website. Access your dashboard in a few clicks and start managing your site’s content and settings effortlessly.
Giving NB Technologies Access to Your Facebook Business Page
Discover how to effortlessly give NB Technologies access to your Facebook Business Page with our comprehensive guide. Perfect for streamlining your social media management.
How to Give NBT Admin Permissions for Your Google Business Profile
Learn how to grant admin permissions to NB Technologies for your Google Business Profile with our easy step-by-step guide. Manage your online presence more effectively!
How to Send Files via WeTransfer
Explore our guide on using WeTransfer effectively: Learn best practices for sending files and streamline your digital transfers with ease.